I/O Alias
Unknown Attachment
|
|
|
|
|---|---|---|
|
1 |
Controller Digital I/O |
The name of the controller digital I/O can be set individually. |
|
2 |
Flange Digital I/O |
The name of the flange digital I/O can be set individually. |
|
3 |
Controller Analog I/O |
The name of the controller analog I/O can be set individually. |
|
4 |
Flange Analog Input |
The name of the flange analog I/O can be set individually. |
|
5 |
I/O Name |
The name can be up to 40 characters long. |
Mount
The robot installation pose can be set in Robot Parameters > Robot Settings > Mount.
-
-
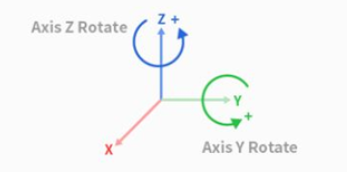
If the robot is installed on the ceiling or wall, the robot installation angle can be set with Y-axis and Z-axis rotations.
-
As auto tool weight calculation is performed based on gravity, it is recommended to reset the tool weight once mount setting is done.
Unknown Attachment
|
|
|
|
|---|---|---|
|
1 |
Lock Toggle Button |
|
|
2 |
Use Mount |
|
|
3 |
Auto Measure |
|
|
4 |
Information Image |
This is an image that tells you about the Mount. |
|
5 |
Information Message |
This is a message that tells you about the Auto Measure. |
|
6 |
Increment/Decrement Button |
This allows you to increment or decrement as much as desired. |
|
7 |
Y-Axis Rotate Input Field |
The Y-axis rotation angle can be entered directly. |
|
8 |
Z-Axis Rotate Input Field |
The Z-axis rotation angle can be entered directly. |
|
9 |
Apply Button |
This allows the set values to be applied. |