Robot Installation 1
Remove packing
MANDATORY EASY 3 MIN
Upon purchasing the Doosan Robotics robot, two boxes containing the robot and controller will be delivered. Remove the packing and check the contents. For more information about the components, refer to Component List.
The manipulator is contained in the larger box.
The controller is contained in the smaller box.
The teach pendant and robot cables are contained in the accessory box

Caution
To ensure safety during delivery, all products are wrapped and packed using solid protective materials, so take caution when removing them from the box.
When removing the product from the box, take caution not to damage to products due to falling.
Connect cable to the controller
MANDATORY EASY 1 MIN
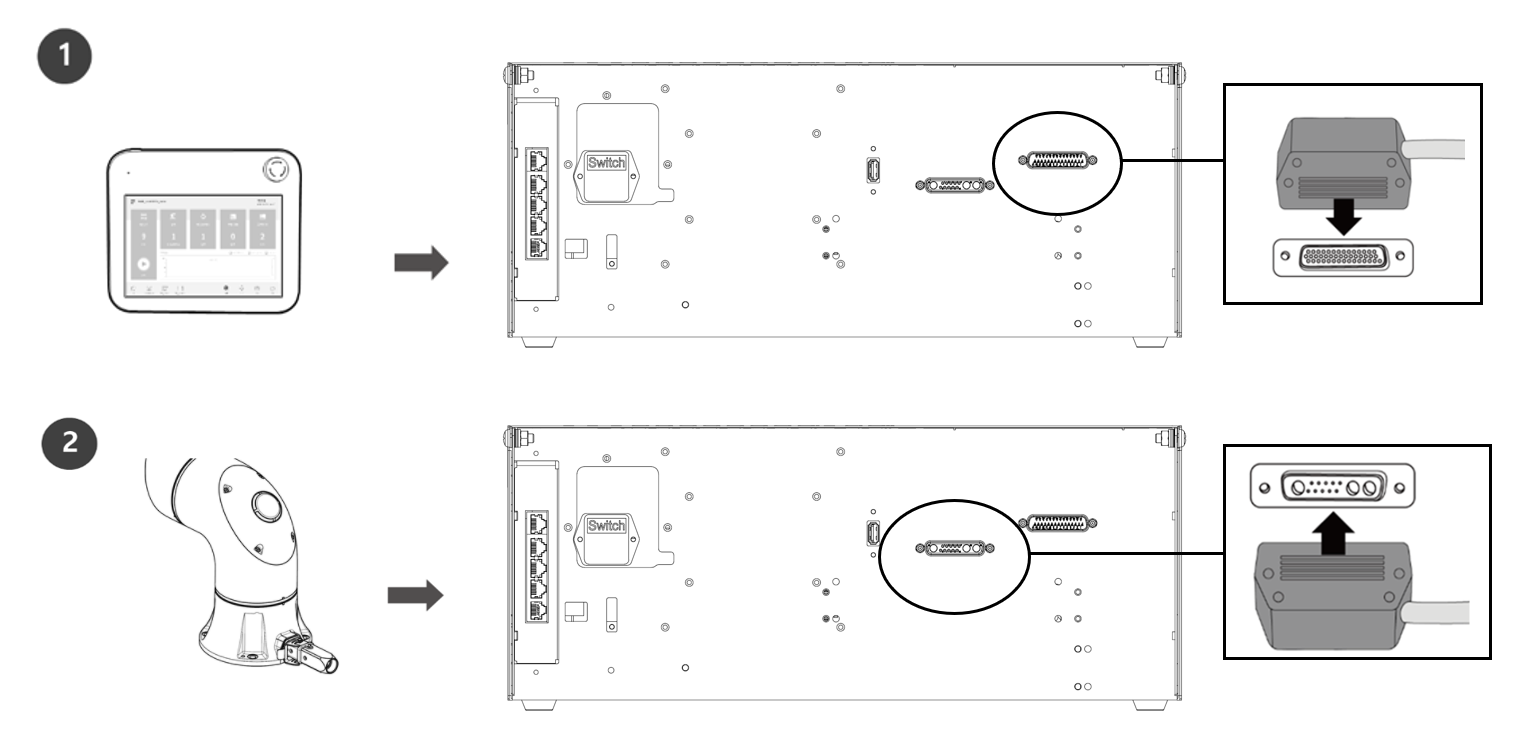
Connect the teach pendant and robot cable to the controller.
Connect the teach pendant cable to the corresponding connections on the controller until it clicks and please make sure that the cable is plugged in tightly.
Connect the opposite end of the robot cable to the corresponding connection of the controller until it clicks and please make sure that the cable is plugged in tightly.

Caution
When connecting the cable, check the shape of the connection before connecting it so that the pin does not bend.
If the noise generated by electromagnetic waves causes issues, it is necessary to install a ferrite core to ensure normal operation. For more information about the ferrite core installation location, refer to the followings:
Fix the robot base
MANDATORY EASY 3 MIN
When fixing the robot base and when installing a tool on the tool flange, the following additional components are required:
M8 hexagonal wrench bolt 4
Φ5 place marker 2
Use M8 bolts in the four 9.0 mm holes on the manipulator base to fix the robot. For more information, refer to Fixing the Robot.
It is recommended to use tightening torque of 20 Nm to tighten the bolts. Use washers (spring-flat) to prevent loosening by vibration.
Use two Φ5 place marker pins to accurately install the robot in a fixed location.
Note
M/A/H/E/P Ground Tap Fastening Guide
Ground tap added to Robot Base ('23 December related design change approval completed: ECO00371_Robot Base Ground Bolt Fastening Part Added)
Ground bolt is not included, users can prepare and fasten it themselves as needed
Ground bolt specifications: M4X4L
Guide text example: All robots of Doosan Robotics are provided with an external ground tap. If grounding is required depending on the usage environment, you can connect the ground wire using the M4X4L bolt. The ground tap is located near the ground label.
Ground label

