Robot limits and safety
Robot Limits Setting
In Robot Limits, various limits related to the robot can be set. These limits are used to ensure the robot operates safely within the set limits.
Robot limits can be set in Robot Parameter > Safety Settings > Robot Limits.
For a detailed description of each limit, refer to Robot Limits.
Robot Limits are largely divided into 3 categories. Each category includes the following screens and functions.
Menu
Items | Description | |
|---|---|---|
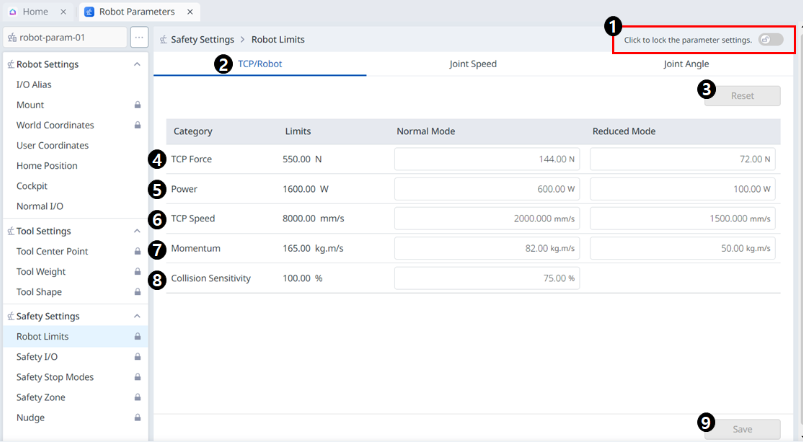
| 1 | Lock toggle button | Used to lock the set value. The safety password is required for modifying the set value. |
| 2 | TCP/Robot | Large classification of robot limits. |
| 3 | Reset | Used to reset settings. |
| 4 | Force | Used to set the force. |
| 5 | Power | Used to set the power. |
| 6 | Speed | Used to set the speed. |
| 7 | Momentum | Used to set the momentum. |
| 8 | Collision | Used to set the collision. |
| 9 | Save | Used to save the applicable setting. |
Menu
Items | Description | |
|---|---|---|
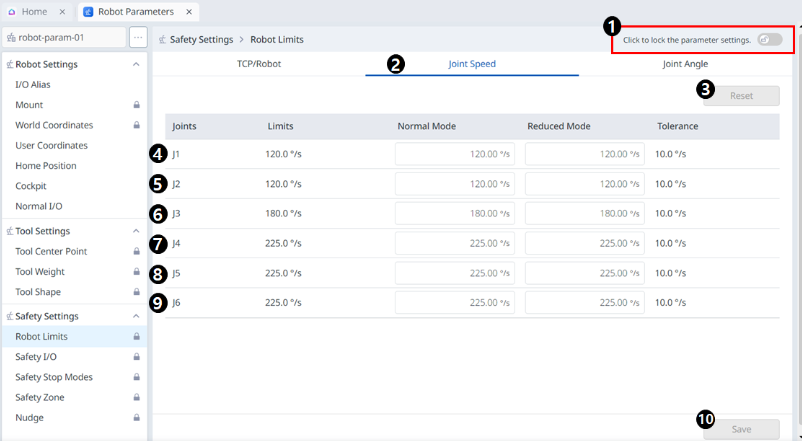
| 1 | Lock toggle button | Used to lock the set value. The safety password is required for modifying the set value. |
| 2 | Joint Speed | Large classification of robot limits. |
| 3 | Reset | Used to reset settings. |
| 4 | J1 | Used to set the settings for Normal and Reduced modes respectively. |
| 5 | J2 | Used to set the settings for Normal and Reduced modes respectively. |
| 6 | J3 | Used to set the settings for Normal and Reduced modes respectively. |
| 7 | J4 (inactive for P series models) | Used to set the settings for Normal and Reduced modes respectively. |
| 8 | J5 | Used to set the settings for Normal and Reduced modes respectively. |
| 9 | J6 | Used to set the settings for Normal and Reduced modes respectively. |
| 10 | Save | Used to save the applicable setting. |
Menu
Items | Description | |
|---|---|---|
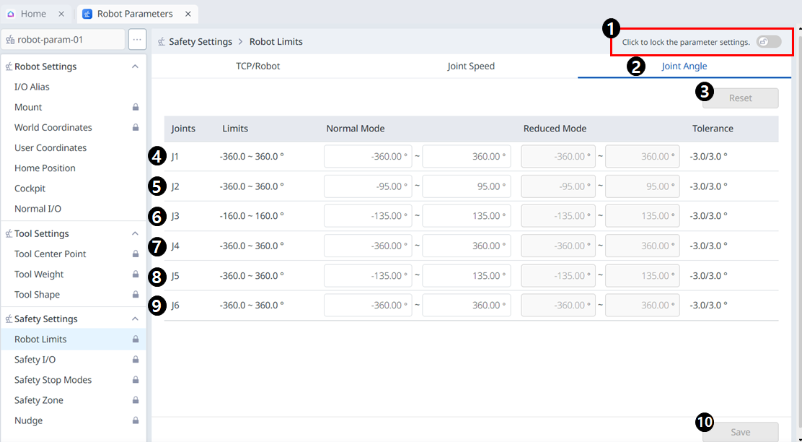
| 1 | Lock toggle button | Used to lock the set value. The safety password is required for modifying the set value. |
| 2 | Joint Angle | Large classification of robot limits. |
| 3 | Reset | Used to reset settings. |
| 4 | J1 | Used to set the settings for Normal and Reduced modes respectively. |
| 5 | J2 | Used to set the settings for Normal and Reduced modes respectively. |
| 6 | J3 | Used to set the settings for Normal and Reduced modes respectively. |
| 7 | J4 (inactive for P series models) | Used to set the settings for Normal and Reduced modes respectively. |
| 8 | J5 | Used to set the settings for Normal and Reduced modes respectively. |
| 9 | J6 | Used to set the settings for Normal and Reduced modes respectively. |
| 10 | Save | Used to save the applicable setting. |
Safety I/O
This function is used to input/output safety-related signals to the redundant terminals. If any of the safety input/output signals are detected to have a different redundant signal, it determines an open circuit or hardware failure and stops the robot in STO stop mode.
To set the Safety I/O, select Robot Parameters > Safety Settings > Safety I/O.
For more information, refer to Safety Signal I/O .
Input
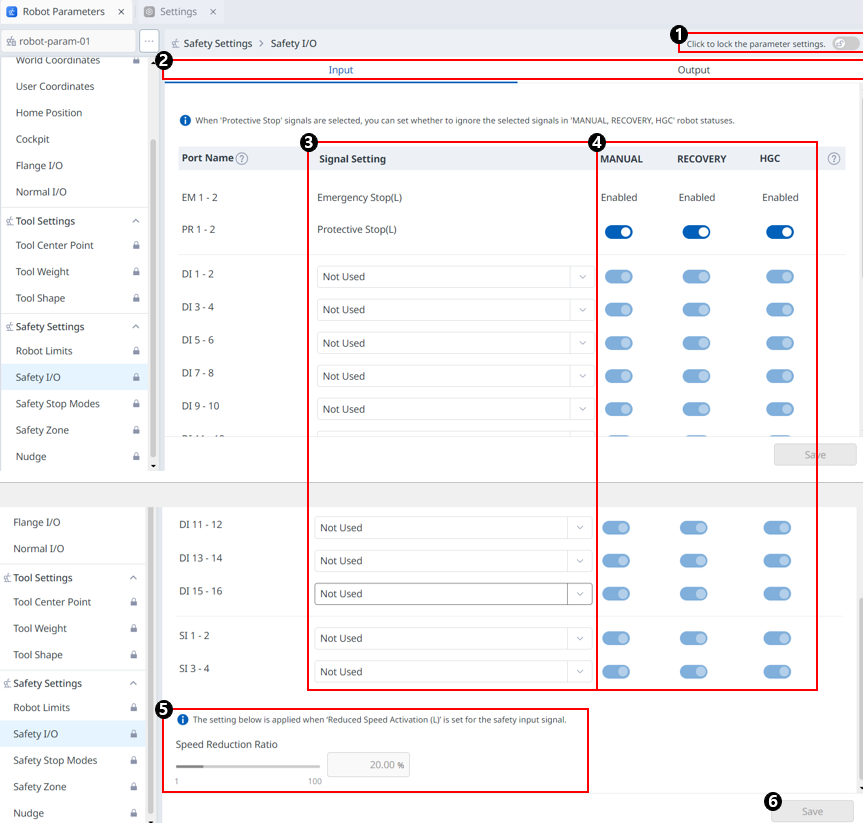
Menu
Items | Description | |
|---|---|---|
| 1 | Lock toggle button | Used to lock the set value. The safety password is required for modifying the set value. |
| 2 | Input/Output | Either Input/Output can be selected to be set. |
| 3 | Signal Setting | Options set for each port. Not Used |
| 4 | Select whether to ignore the signal depending on the robot state | If you select the 'Protective Stop' signal, you can set whether to ignore the selected signal in the 'MANUAL, RECOVERY, HGC' robot states. |
| 5 | Set deceleration rate | You can set the deceleration rate. It can be from 0 to 100. |
| 6 | Save | This button allows you to save the setting you entered. |
Output
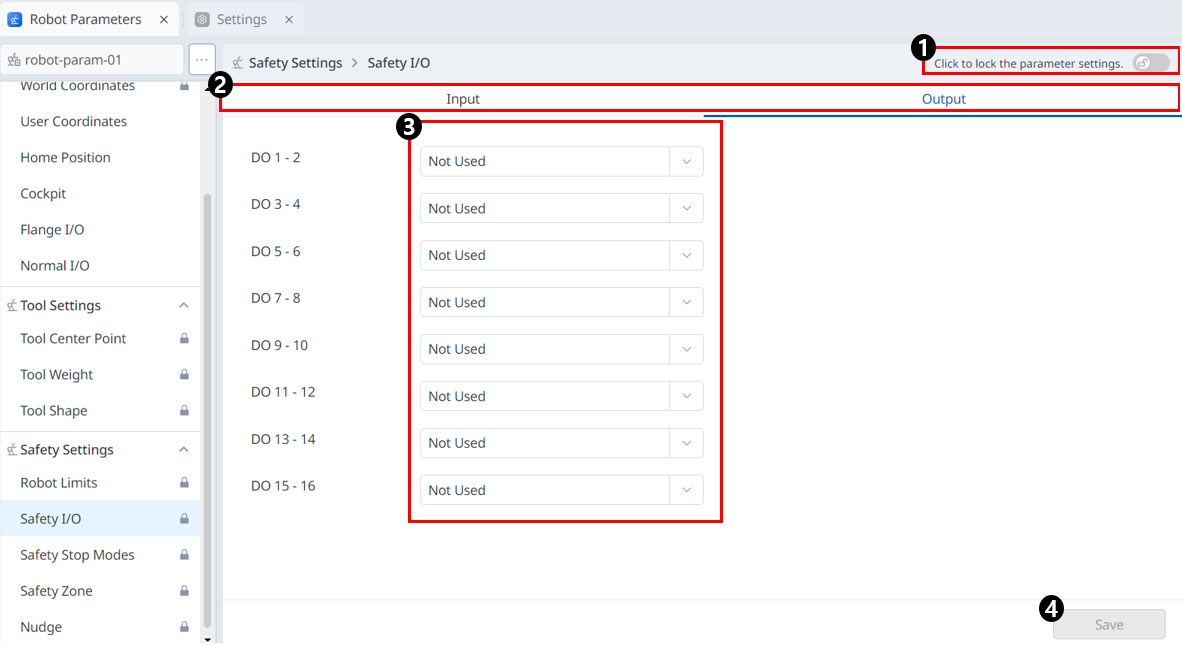
Menu
Items | Description | |
|---|---|---|
| 1 | Lock toggle button | Used to lock the set value. The safety password is required for modifying the set value. |
| 2 | Input/Output | Either Input/Output can be selected to be set. |
| 3 | Signal Setting | Options set for each port. Not Used |
| 4 | Save | This button allows you to save the setting you entered. |
Safety Stop Modes Settings
Learn the types of safety stops and how to engage/disengage safety stop.
Types of Safety Stops
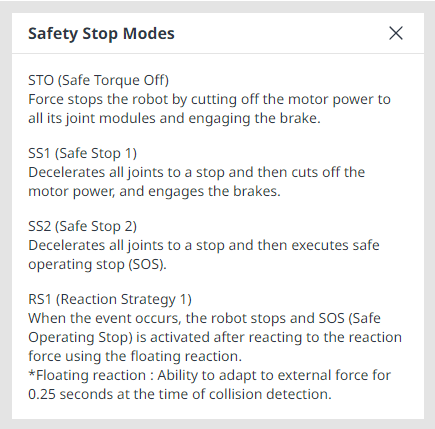
The stop modes provided to ensure user safety are as follows:
STO (Safe Torque Off): Stops Servo Off (motor power is immediately turned off)
SS1 (Safe Stop 1): Servo Off after maximum deceleration stop
SS2 (Safe Stop 2): Standby after maximum deceleration stop (pause)
RS1: Upon collision, complies to the direction opposite of the collision and then enters standby (can only be set in Collision Detection/TCP Force Limit Violation)
Doosan Robotics robots have two types of safety stop functions. Emergency Stop is used for general emergency situations, and the robot can resume operation with Servo On after releasing the emergency stop. In case of Protective Stop, the robot can resume operation by resolving the cause of Protective Stop and releasing the stop.
Emergency Stop: It sets the stop mode when the Emergency Stop button of the teach pendant or an additionally installed external device is activated
It activates when the Emergency Stop switch of the teach pendant or the one connected to the TBSFT EM terminal is pressed.
Only STO or SS1 can be selected.
Protective Stop: It sets the stop mode when the externally connected protective equipment is activated
It activates when the protective equipment connected to the TBSFT PR terminal is activated.
For more information on the Safety Stop functions, refer to Safety Functions.
How to engage/disengage Safety Stop
Press the Emergency Stop button on the teach pendant or activate the safety device connected to the Safety I/O to activate emergency stop. Safety devices can be connected to Emergency Stop or Protective Stop through Robot Parameters > Safety Settings > Safety I/O functions of the teach pendant screen.
For more information about connecting a safety device to Safety I/O, refer to Connect Controller I/O.
For information on how to set the safety stop function for this connection in the program, refer to Safety Signal I/O.
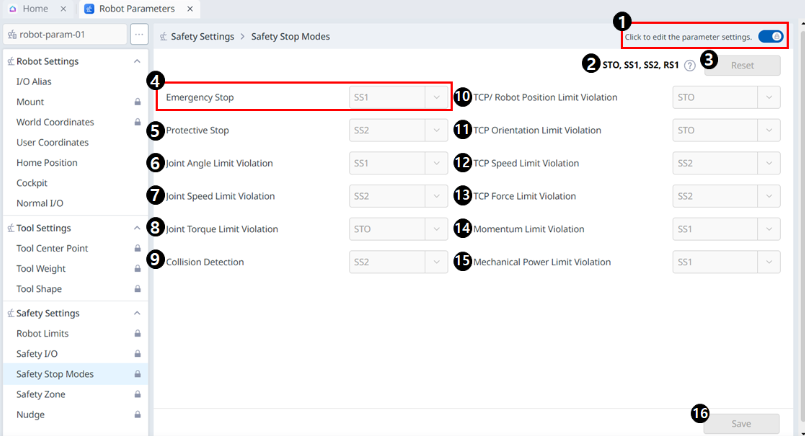
Menu
Items | Description | |
|---|---|---|
| 1 | Lock toggle button | Used to lock the set value. The safety password is required for modifying the set value. |
| 2 | Information message | A message providing information necessary for setting. |
| 3 | Reset | A button to reset the settings. |
| 4 | Emergency Stop | A Safety Stop can be selected to be used for the corresponding item. The drop-down menus include: STO SS1 |
| 5 | Protective Stop | A Safety Stop can be selected to be used for the corresponding item. The drop-down menus include: SS1 SS2 |
| 6 | Joint Angle Limit Violation | A Safety Stop can be selected to be used for the corresponding item. The drop-down menus include: STO SS1 SS2 |
| 7 | Joint Speed Limit Violation | A Safety Stop can be selected to be used for the corresponding item. The drop-down menus include: STO (Except for H/P Series) SS1 SS2 |
| 8 | Joint Torque Limit Violation | Only STO is available. |
| 9 | Collision Detection | A Safety Stop can be selected to be used for the corresponding item. The drop-down menus include: STO (Except for H/P Series) SS1 SS2 RS1 |
| 10 | TCP Robot Position Limit Violation | A Safety Stop can be selected to be used for the corresponding item. The drop-down menus include: STO SS1 SS2 |
| 11 | TCP Orientation Limit Violation | A Safety Stop can be selected to be used for the corresponding item. The drop-down menus include: STO (Except for H/P Series) SS1 SS2 |
| 12 | TCP Speed Limit Violation | A Safety Stop can be selected to be used for the corresponding item. The drop-down menu includes the following: STO (Except for H/P Series) SS1 SS2 |
| 13 | TCP Force Limit Violation | A Safety Stop can be selected to be used for the corresponding item. The drop-down menus include: STO (Except for H/P Series) SS1 SS2 |
| 14 | Momentum Limit Violation | A Safety Stop can be selected to be used for the corresponding item. The drop-down menus include: STO (Except for H/P Series) SS1 SS2 |
| 15 | Mechanical Limit Violation | A Safety Stop can be selected to be used for the corresponding item. The drop-down menus include: STO (Except for H/P Series) SS1 SS2 |
| 16 | Save | This button allows you to save the setting values. |
Note
The following pop-up appears on the information message: